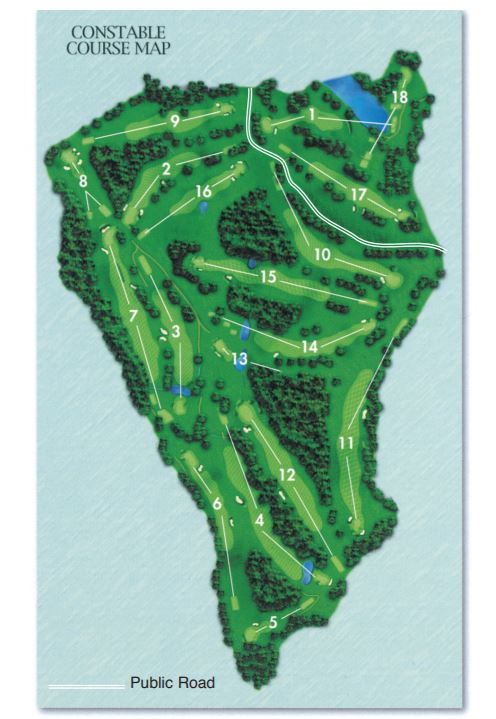
- Discover our 18 hole golf course
- 1
- 2
- 3
- 4
- 5
- 6
- 7
- 8
- 9
- 10
- 11
- 12
- 13
- 14
- 15
- 16
- 17
- 18
- White
- 326 yards
- Par 4
- Green
- 328 yards
- Yellow
- 271 yards
- Blue
- 235 yards
Hole 1
A daunting tee shot will distract many. A tee shot up the left will run down to a collection area on the right of the fairway. An uphill approach will mean that the bottom of the pin will not be visible but anywhere on this relatively flat green is a good result.
- White
- 337 yards
- Par 4
- Green
- 321 yards
- Yellow
- 310 yards
- Blue
- 196 yards
Hole 2
A long iron for the longer hitters is enough club from this tee. A fairway bunker collects tee shots up the left and so the right-hand side should be favoured. A clear opening towards the front right of the green should be the target onto a green that is large in size.
- White
- 395 yards
- Par 4
- Green
- 378 yards
- Yellow
- 310 yards
- Blue
- 210 yards
Hole 3
A tricky but panoramic tee shot where a left to right shot is favoured. Don’t overdo it as the chance of finding the green in 2 from the trees on the right is almost impossible. A large pond guards the green and so laying up for a 3rd is hugely advisable
- White
- 513 yards
- Par 5
- Green
- 493 yards
- Yellow
- 462 yards
- Blue
- 359 yards
Hole 4
We have lift-off! Get ready to open your shoulders on this hole. With a huge amount of space on the right of the fairway, many chose to aim at the fairway bunker and unleash down this hole. Longer hitters will have the option of attempting the green in 2 but they'll need a great shot to do it. Carrying over water, the green is typical of a par 5 and fairly small in size. Run-off areas on the front of the green bring the water into play. This hole defines "risk and reward"
- White
- 183 yards
- Par 3
- Green
- 165 yards
- Yellow
- 154 yards
- Blue
- 93 yards
Hole 5
The first par 3 of the round and it’s a difficult one. With an upturned green making finding the putting surface difficult, many rely on their chipping and putting to make a par on this hole
- White
- 360 yards
- Par 4
- Green
- 340 yards
- Yellow
- 336 yards
- Blue
- 219 yards
Hole 6
A semi-blind tee shot where the longer hitters will not see their ball come down. The ideal line is between the marker post and the tree line, but bailing out right is by far the safest shot. A difficult approach from a sloping lie makes this green extremely difficult to find in regulation. make your par, and run to the next tee
- White
- 512 yards
- Par 5
- Green
- 471 yards
- Yellow
- 426 yards
- Blue
- 375 yards
Hole 7
An elevated tee once again gives great views of the surrounding countryside. An ideal tee shot runs up the right-hand side to avoid some thick rough down the left and once there, the layup can be difficult. The perfect shot carries over the bunker on the right-hand side of the fairway and leaves a pitch up the full length of the small green. whilst heavily undulating surroundings, the green is relatively flat and will give birdie opportunities
- White
- 139 yards
- Par 3
- Green
- 125 yards
- Yellow
- 115 yards
- Blue
- 110 yards
Hole 8
A short par 3 which may come across as fairly simple. A large green can make putting difficult and so emphasises the importance of selecting the correct club.
- White
- 404 yards
- Par 4
- Green
- 377 yards
- Yellow
- 356 yards
- Blue
- 270 yards
Hole 9
Through the valley. Often a shorter club travels equally far from the tee when using the severe downslope. The 2nd is difficult and involves playing to a raised green. Greenside bunkers can restrict the "runner" making this hole one of the most difficult on the course
- White
- 439 yards
- Par 4
- Green
- 404 yards
- Yellow
- 401 yards
- Blue
- 283 yards
Hole 10
A sweeping dogleg that turns almost 90 degrees. Hitting over the corner will shorten this hole substantially but can be dangerous. The approach leads to a green that slopes heavily from back to front. Long of this green is dead and so the best shot is to aim short of the pin, regardless of its position.
- White
- 546 yards
- Par 5
- Green
- 498 yards
- Yellow
- 464 yards
- Blue
- 404 yards
Hole 11
Longer hitters may lose sight of their ball down the 11th. A downhill second will frame the green beautifully in the background. The green lends itself to both sweetly struck long irons and well-played wedges. This hole is a great opportunity to post a red number on the scorecard
- White
- 409 yards
- Par 4
- Green
- 382 yards
- Yellow
- 359 yards
- Blue
- 305 yards
Hole 12
The flattest hole on the course. A stream runs all the way up the left which will lead many to miss right. A large green is well defended by a number of bunkers. If negotiated successfully, a subtle green can make putting challenging. 4 is a great score here.
- White
- 132 yards
- Par 3
- Green
- 122 yards
- Yellow
- 122 yards
- Blue
- 67 yards
Hole 13
A stunning par 3 played from a raised tee. Tee shots will have to safely carry a water hazard that sits in front of the green. A picture-perfect example of what a par 3 should be.
- White
- 443 yards
- Par 5
- Green
- 393 yards
- Yellow
- 367 yards
- Blue
- 234 yards
Hole 14
A tough tee shot where the favoured shape goes against the camber of the fairway. Hugging the left will shorten the hole considerably but may cause issues on the 2nd shot if not far enough. The green may not be visible for the approach and so the large marker at the back of the green should be used as a guide. a really tough Par 4.
- White
- 499 yards
- Par 5
- Green
- 479 yards
- Yellow
- 460 yards
- Blue
- 370 yards
Hole 15
Strategy is key on this par 5. A long hitter may need less than a driver, as a severe downslope can send the ball down towards a ditch on the left, or hazard on the right of the fairway. The approach may well be played from a severe downslope to a green that sits above the player. The yardage is short, but by no means is this a gimmie 5.
- White
- 285 yards
- Par 4
- Green
- 268 yards
- Yellow
- 251 yards
- Blue
- 215 yards
Hole 16
Everyone loves a driveable par 4 right? Whilst the green sits level, the fairway slopes severely down, and then back up before you get there. A large greenside bunker is a real danger here which will make 4 almost impossible. A 2 tiered green can make putting difficult.
- White
- 343 yards
- Par 4
- Green
- 325 yards
- Yellow
- 316 yards
- Blue
- 245 yards
Hole 17
Many players will need less than a driver here. A sloped fairway means that placement is more important than distance, and so many lay up to a shelf on the right-hand side of the fairway. The green is well protected by bunkers left and right and so carrying the ball all the way to the green can be advantageous. the subtle sloping of the green from back to front may catch a few out on this green.
- White
- 207 yards
- Par 3
- Green
- 192 yards
- Yellow
- 148 yards
- Blue
- 69 yards
Hole 18
A brutally tough finish. Up to 200+ yards from the back tee makes this hole extremely difficult. The small green is relatively flat once you get there, you may just need to chip and putt here. Good news though, look up and the shining lights of the clubhouse will greet you.


 Special Offers

