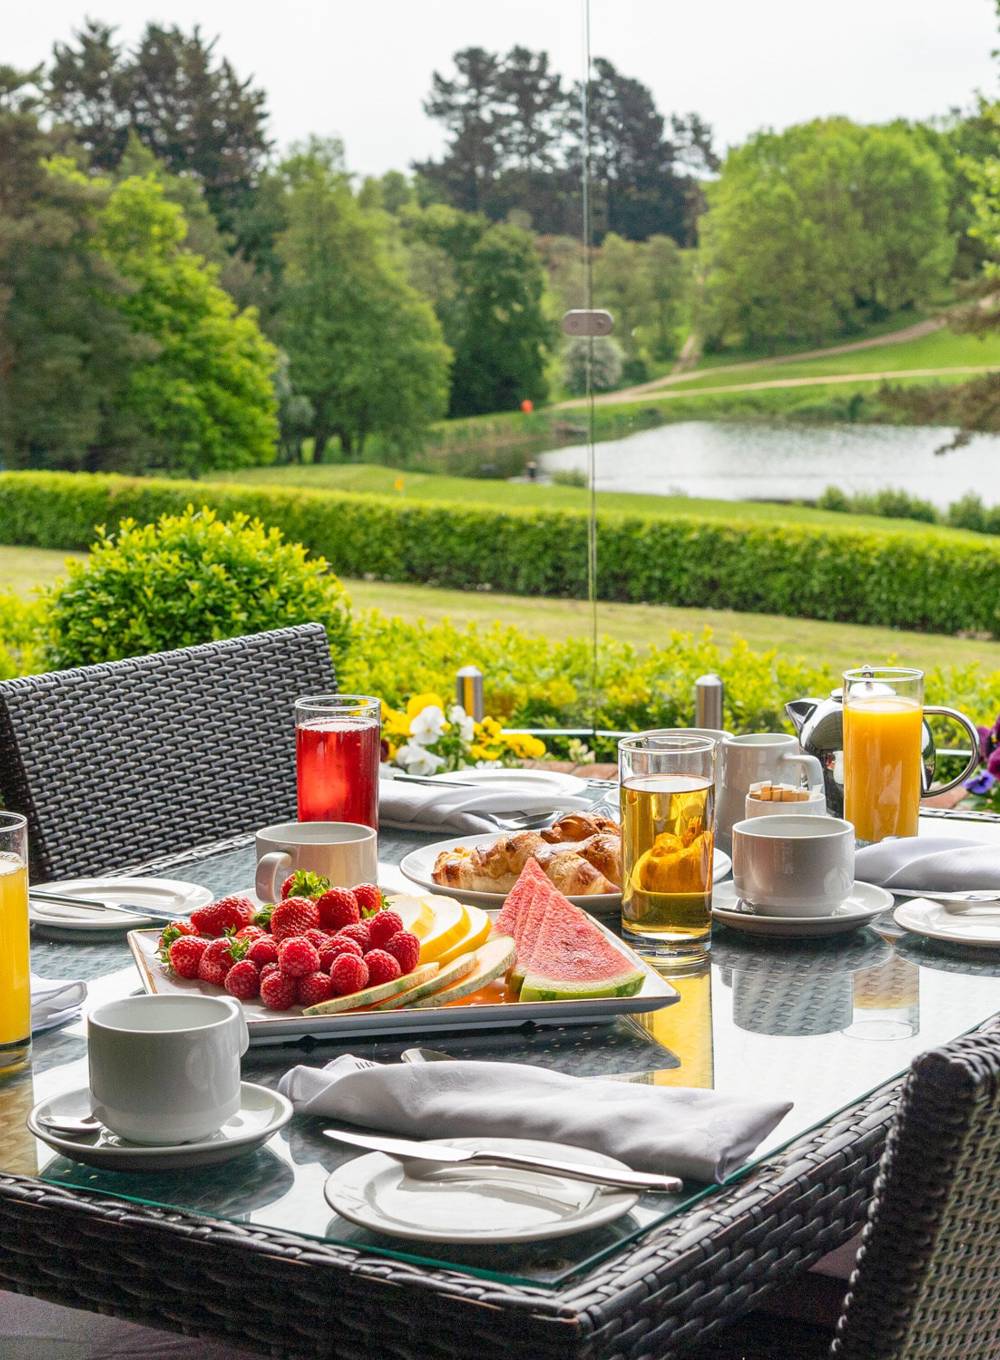

The Gainsborough Course

A fairly gentle opening hole that may only require a long iron for an advanced player. The key here is to find the flat part of the fairway to aid an accurate approach onto the green.
- White 337 yards
- Green 322 yards
- Yellow 299 yards
- Blue 162 yards
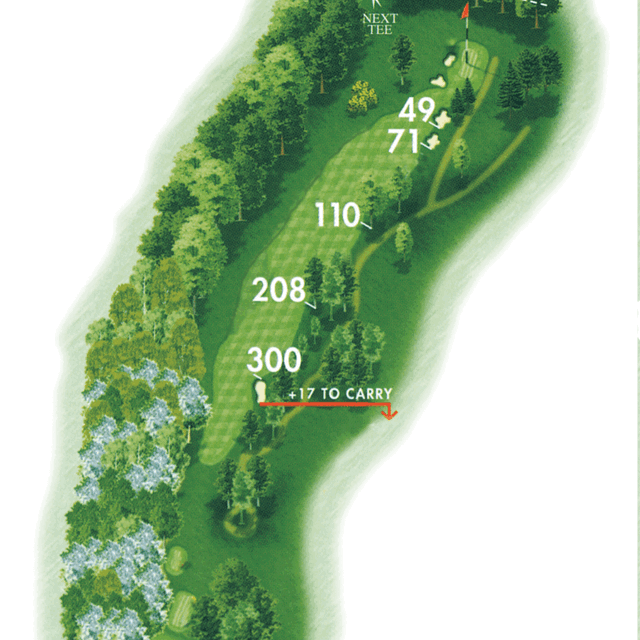
The first of 2 par 5's on the front 9 requires a tee shot the hugs the right-hand side of a sloping fairway. You'll then need to negotiate a small ditch that dissects the fairway before an uphill approach onto a green that slopes severely from back to front. Make sure to hit your approach onto the correct tier on the green otherwise a difficult 2 putt awaits you.
- White 521 yards
- Green 517 yards
- Yellow 407 yards
- Blue 247 yards
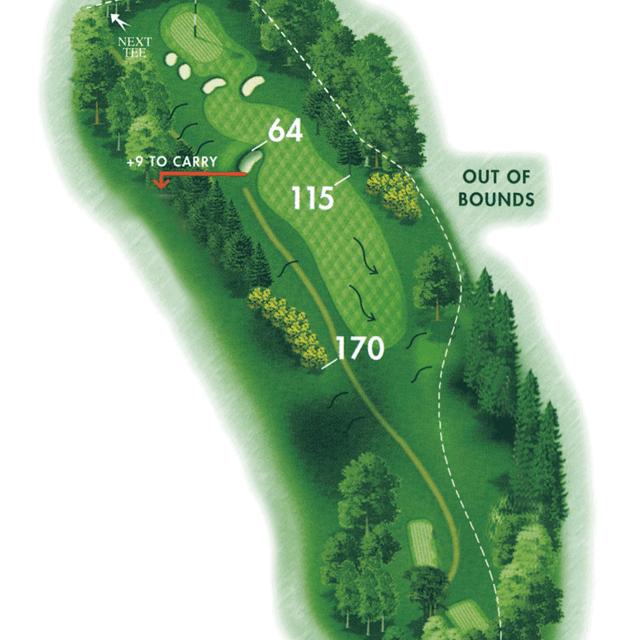
This hole is small but mighty. You'll need to be deadly accurate for the shortest hole on the course. Don’t be fooled into thinking this one is a gimmie.
- White 108 yards
- Green 103 yards
- Yellow 103 yards
- Blue 103 yards
Fire away! This is one of the most inviting tee shots on the course. The generous fairway of our 4th hole allows you to open your shoulders and go for that big drive. Once the drive is successfully negotiated, a narrow entrance into a fairly small green sits in front of you. Make your par and run to the next tee, This hole is TOUGH.
- White 453 yards
- Green 442 yards
- Yellow 431 yards
- Blue 317 yards
Right-handed golfers are going to require left to right fade off the tee to set up the best 2nd and 3rd shots into this Par 5. A collection of bunkers short right of the green will collect a slightly wayward approach shot but execute properly and you'll have a good look at birdie.
- White 512 yards
- Green 495 yards
- Yellow 439 yards
- Blue 388 yards
The raised tee of the 6th gives great views. Once on the fairway, you'll head back uphill towards the green. Filter your approach shot in from the bank on the left to bring the ball nicely onto the green. Just be sure to miss the bunker waiting for you on the front left of the green.
- White 416 yards
- Green 377 yards
- Yellow 332 yards
- Blue 231 yards
Another fairly short par 3. An extremely narrow green doesn’t leave much margin for error. Long is a disaster here, so correct club selection is essential.
- White 136 yards
- Green 131 yards
- Yellow 111 yards
- Blue 75 yards
The long hitter may be tempted to drive the green here. Otherwise, stay clear of the large fairway bunker that sits on the left-hand side of the landing zone for most players. A relatively flat putting surface will lend itself to good scoring on this hole.
- White 359 yards
- Green 311 yards
- Yellow 272 yards
- Blue 205 yards
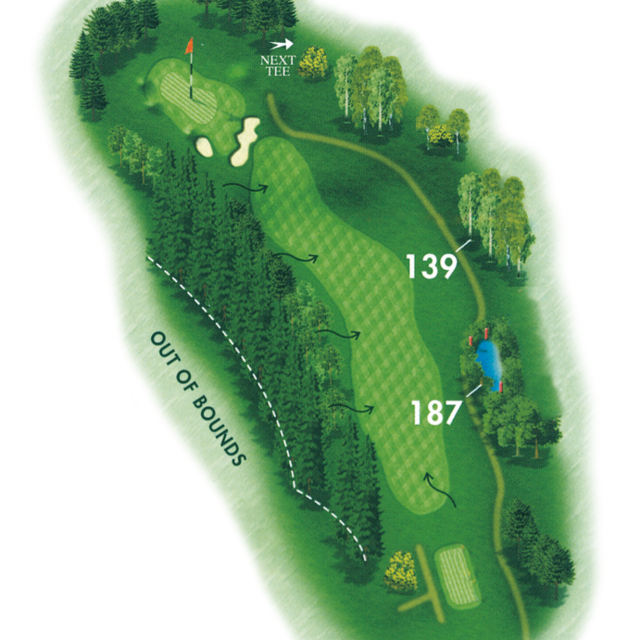
A tricky downhill par 3 to sign off the front 9. 3 is a great score here. To give yourself the best chance, aim towards the front right of the green. From there, take your chances at a 2 putt for your par.
- White 193 yards
- Green 190 yards
- Yellow 139 yards
- Blue 139 yards
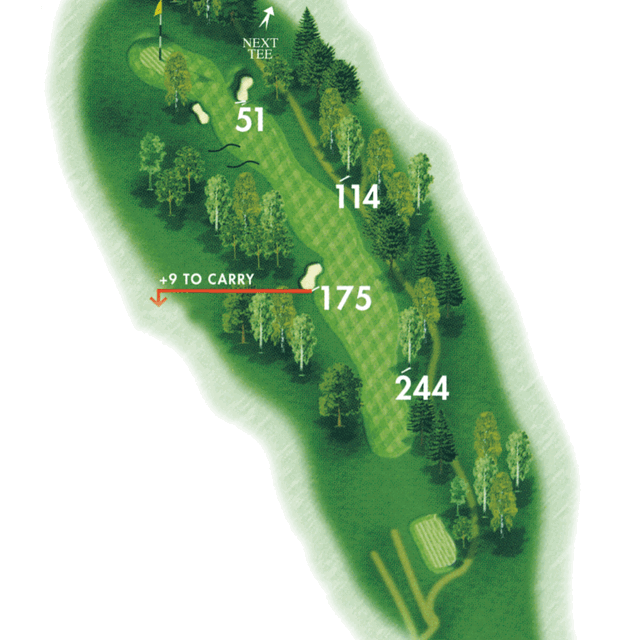
Signature hole time! And, once you stand on the tee, you'll see why. Keep your tee shot towards the left hand side of the fairway to be safe. Once there, take your chances at a long approach over water towards a green that slopes severely. Not many make par here so if you do, be sure to celebrate in style.
- White 408 yards
- Green 342 yards
- Yellow 309 yards
- Blue 233 yards
A par 3 where depending on the pin position, you may not see the bottom of the hole. 3 is a great score here so avoid the right bunker by aiming towards the left-hand side of the green where a mound will move the ball towards the hole.
- White 172 yards
- Green 148 yards
- Yellow 126 yards
- Blue 75 yards
Everyone loves a driveable par 4. Bigger hitters will be disappointed not to make birdie here but trouble awaits the bad shot with bunkers scattered across the full length of the hole.
- White 286 yards
- Green 268 yards
- Yellow 258 yards
- Blue 231 yards
Hug the right-hand side of the fairway from the tee to set up the best angle for your approach shot. Tree limbs overhang the right-hand side of the green which means a flighted approach may produce better results. Subtle slopes in the green can make holing putts on this hole difficult.
- White 405 yards
- Green 396 yards
- Yellow 375 yards
- Blue 288 yards
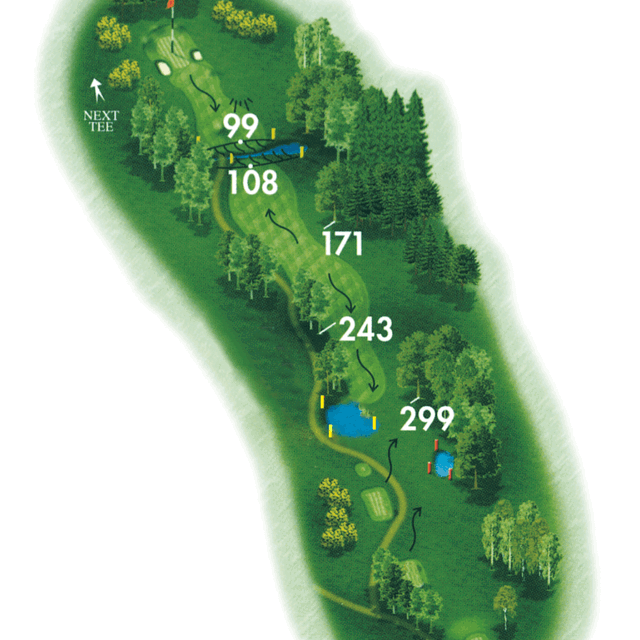
Another par 5 that favours a left to right shot from the tee. Once on a fairly generous fairway, you'll have options of laying up or attempting the green in 2. When laying up, you'll need to avoid 2 cross bunkers that run across the full width of the fairway. It may just tempt you into that long fairway wood towards the green.
- White 503 yards
- Green 479 yards
- Yellow 466 yards
- Blue 356 yards
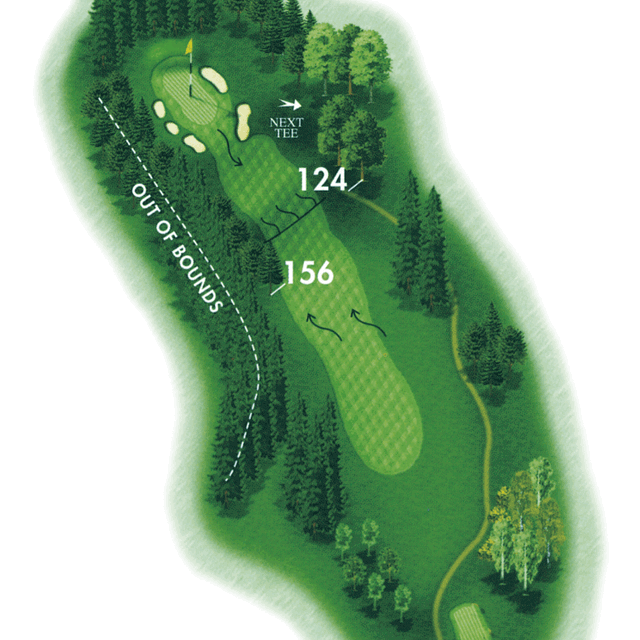
A tee shot down the left of this hole is the shortest route to the green. A collection area short right of the green will collect longer tee shots and leave a fairly straightforward pitch up to what is the longest green on the course. With such a big green, club selection is essential.
- White 349 yards
- Green 332 yards
- Yellow 318 yards
- Blue 241 yards
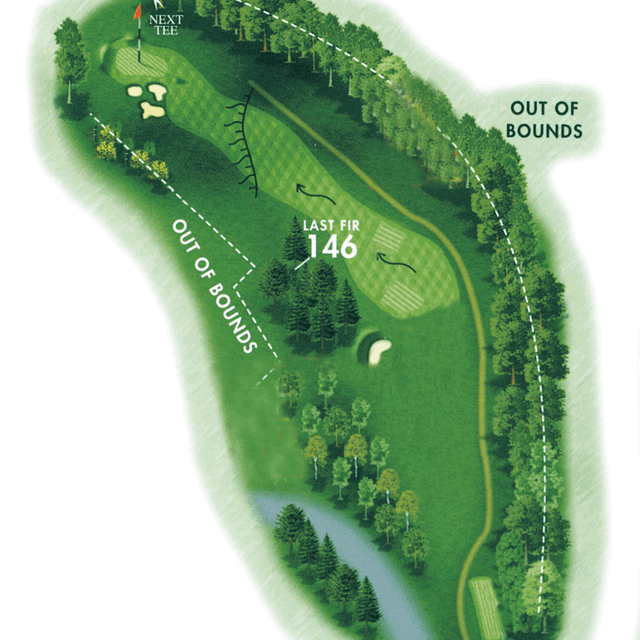
A tricky fairway that slopes servely from right to left can make this tee shot difficult. Hitting towards the trees on the right will give you the best chance of finding the fairway. Once there, be careful with your layup. Too much club can send you into a gully 100 yards short of the green that will impair your vision for your approach. large slopes in the green mean that everyone walks off this hole very happy with a par.
- White 549 yards
- Green 525 yards
- Yellow 426 yards
- Blue 389 yards
Longer hitters will not require a wood here. This hole demands precision from the tee. A small shelf on the right-hand side of the fairway gives the best approach to a long and narrow green.
- White 343 yards
- Green 289 yards
- Yellow 265 yards
- Blue 198 yards
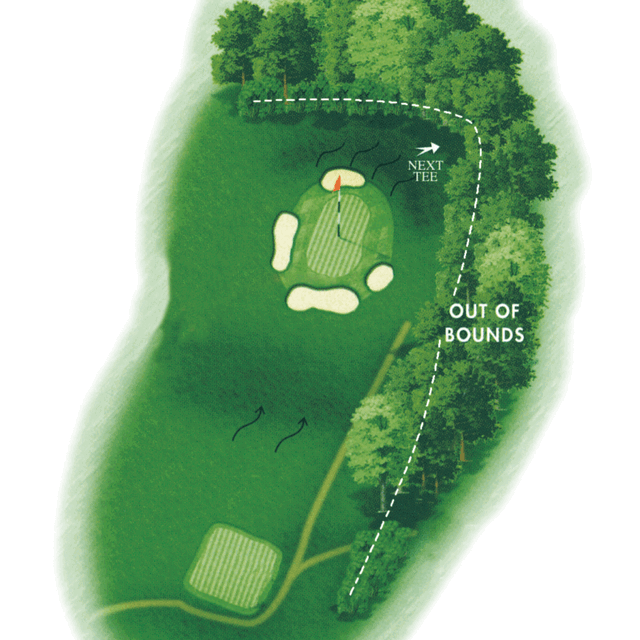
One of our most photographed holes to finish. a mid-length par 3 which has numerous defenses. A large hollow sits left and a bunker right of the green waiting to catch an errant shot. No 2 putt is guaranteed on the slopey green. From the green, the 19th hole awaits!
- White 184 yards
- Green 179 yards
- Yellow 137 yards
- Blue 134 yards
Key Facts
- The amateur course record from the white tees is 63
- In competitions during 2017, the 10th hole has only recorded 4 birdies
- The 10th hole is the hardest on the course, with an average score of 5.77 for men and 6.64 for ladies
- The Gainsborough is 6,321 yards from the white tees
The Constable Course
A daunting tee shot will distract many. A tee shot up the left will run down to a collection area on the right of the fairway. An uphill approach will mean that the bottom of the pin will not be visible but anywhere on this relatively flat green is a good result.
- White 325 yards
- Green 331 yards
- Yellow 271 yards
- Blue 237 yards
A long iron for the longer hitters is enough club from this tee. A fairway bunker collects tee shots up the left and so the right-hand side should be favoured. A clear opening towards the front right of the green should be the target onto a green that is large in size.
- White 334 yards
- Green 324 yards
- Yellow 309 yards
- Blue 177 yards
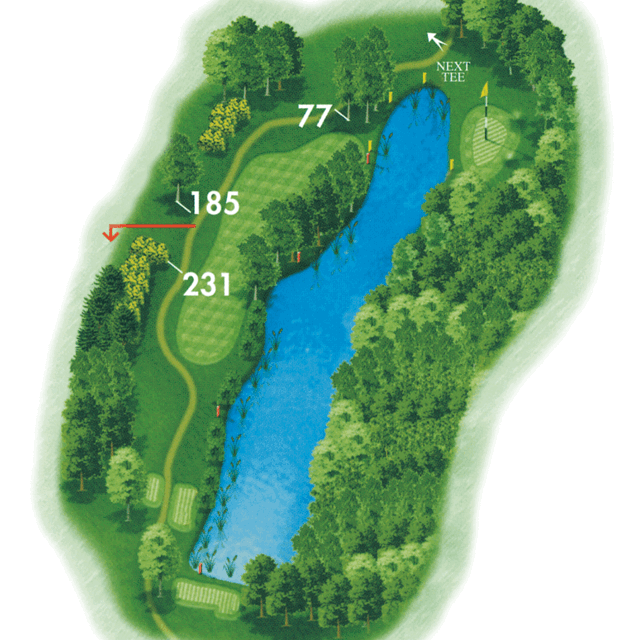
A tricky but panoramic tee shot where a left to right shot is favoured. Don’t overdo it as the chance of finding the green in 2 from the trees on the right is almost impossible. A large pond guards the green and so laying up for a 3rd is hugely advisable.
- White 400 yards
- Green 379 yards
- Yellow 365 yards
- Blue 228 yards
We have lift-off! Get ready to open your shoulders on this hole. With a huge amount of space on the right of the fairway, many chose to aim at the fairway bunker and unleash down this hole. Longer hitters will have the option of attempting the green in 2 but they'll need a great shot to do it. Carrying over water, the green is typical of a par 5 and fairly small in size. Run-off areas on the front of the green bring the water into play. This hole defines "risk and reward".
- White 509 yards
- Green 489 yards
- Yellow 469 yards
- Blue 363 yards
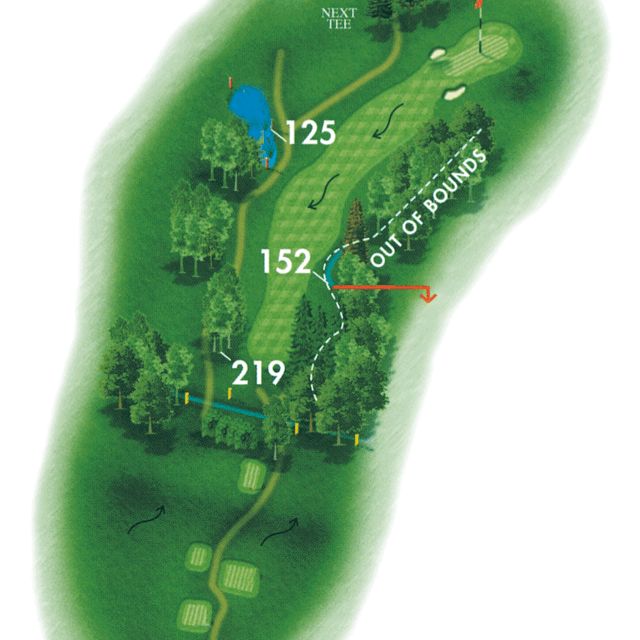
The first par 3 of the round and it’s a difficult one. With an upturned green making finding the putting surface difficult, many rely on their chipping and putting to make a par on this hole.
- White 182 yards
- Green 172 yards
- Yellow 160 yards
- Blue 72 yards
A semi-blind tee shot where the longer hitters will not see their ball come down. The ideal line is between the marker post and the tree line, but bailing out right is by far the safest shot. A difficult approach from a sloping lie makes this green extremely difficult to find in regulation. make your par, and run to the next tee.
- White 361 yards
- Green 347 yards
- Yellow 338 yards
- Blue 205 yards
An elevated tee once again gives great views of the surrounding countryside. An ideal tee shot runs up the right-hand side to avoid some thick rough down the left and once there, the layup can be difficult. The perfect shot carries over the bunker on the right-hand side of the fairway and leaves a pitch up the full length of the small green. whilst heavily undulating surroundings, the green is relatively flat and will give birdie opportunities.
- White 507 yards
- Green 498 yards
- Yellow 427 yards
- Blue 339 yards
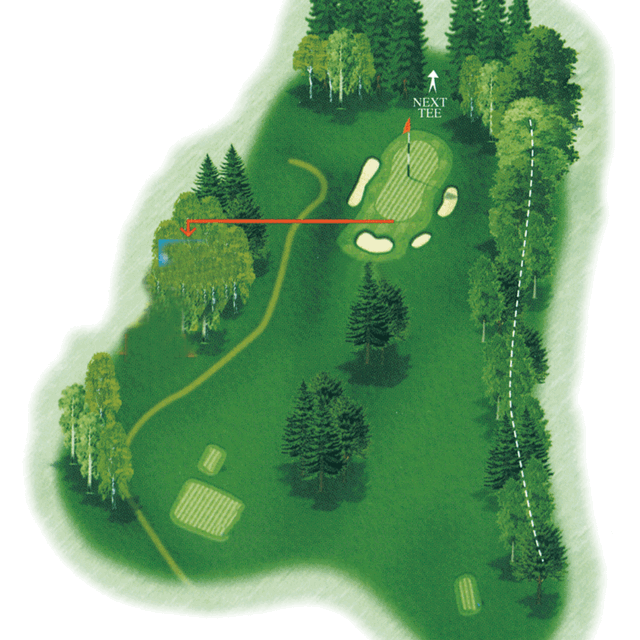
A short par 3 which may come across as fairly simple. A large green can make putting difficult and so emphasises the importance of selecting the correct club.
- White 135 yards
- Green 122 yards
- Yellow 113 yards
- Blue 109 yards
Through the valley. Often a shorter club travels equally far from the tee when using the severe downslope. The 2nd is difficult and involves playing to a raised green. Greenside bunkers can restrict the "runner" making this hole one of the most difficult on the course.
- White 397 yards
- Green 374 yards
- Yellow 355 yards
- Blue 227 yards
A sweeping dogleg that turns almost 90 degrees. Hitting over the corner will shorten this hole substantially but can be dangerous. The approach leads to a green that slopes heavily from back to front. Long of this green is dead and so the best shot is to aim short of the pin, regardless of its position.
- White 434 yards
- Green 402 yards
- Yellow 391 yards
- Blue 263 yards
Longer hitters may lose sight of their ball down the 11th. A downhill second will frame the green beautifully in the background. The green lends itself to both sweetly struck long irons and well-played wedges. This hole is a great opportunity to post a red number on the scorecard.
- White 545 yards
- Green 491 yards
- Yellow 467 yards
- Blue 381 yards
The flattest hole on the course. A stream runs all the way up the left which will lead many to miss right. A large green is well defended by a number of bunkers. If negotiated successfully, a subtle green can make putting challenging. 4 is a great score here.
- White 404 yards
- Green 384 yards
- Yellow 361 yards
- Blue 292 yards
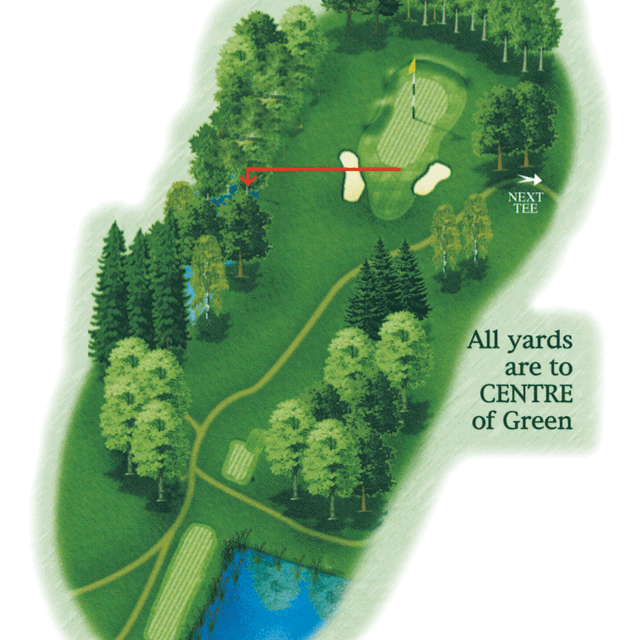
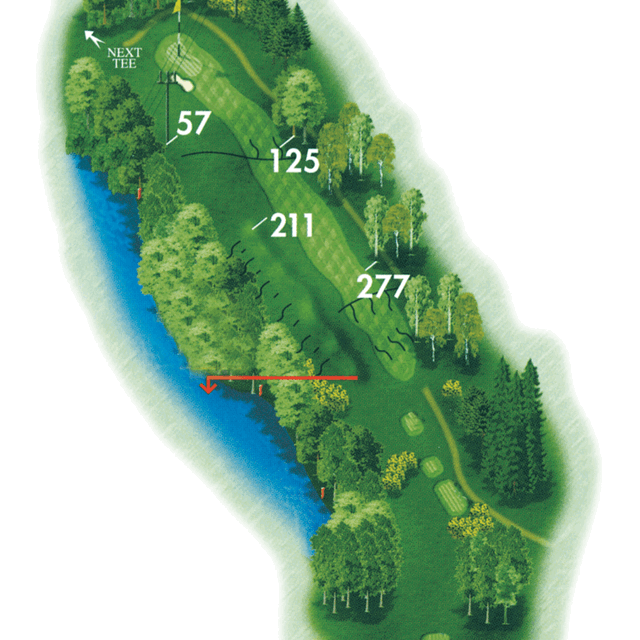
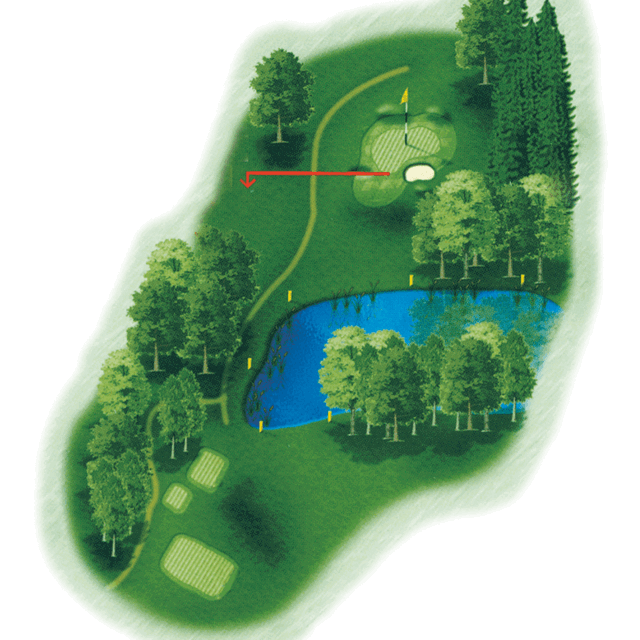
A stunning par 3 played from a raised tee. Tee shots will have to safely carry a water hazard that sits in front of the green. A picture-perfect example of what a par 3 should be.
- White 132 yards
- Green 122 yards
- Yellow 121 yards
- Blue 65 yards
A tough tee shot where the favoured shape goes against the camber of the fairway. Hugging the left will shorten the hole considerably but may cause issues on the 2nd shot if not far enough. The green may not be visible for the approach and so the large marker at the back of the green should be used as a guide. a really tough Par 4.
- White 435 yards
- Green 392 yards
- Yellow 362 yards
- Blue 234 yards
Strategy is key on this par 5. A long hitter may need less than a driver, as a severe downslope can send the ball down towards a ditch on the left, or hazard on the right of the fairway. The approach may well be played from a severe downslope to a green that sits above the player. The yardage is short, but by no means is this a gimmie 5.
- White 495 yards
- Green 481 yards
- Yellow 460 yards
- Blue 362 yards
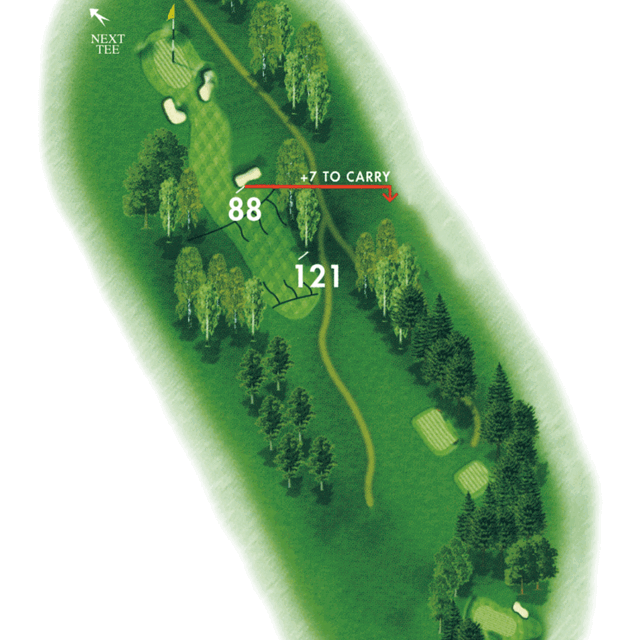
Everyone loves a driveable par 4 right? Whilst the green sits level, the fairway slopes severely down, and then back up before you get there. A large greenside bunker is a real danger here which will make 4 almost impossible. A 2 tiered green can make putting difficult.
- White 282 yards
- Green 265 yards
- Yellow 251 yards
- Blue 206 yards
Many players will need less than a driver here. A sloped fairway means that placement is more important than distance, and so many lay up to a shelf on the right-hand side of the fairway. The green is well protected by bunkers left and right and so carrying the ball all the way to the green can be advantageous. the subtle sloping of the green from back to front may catch a few out on this green.
- White 339 yards
- Green 328 yards
- Yellow 315 yards
- Blue 215 yards
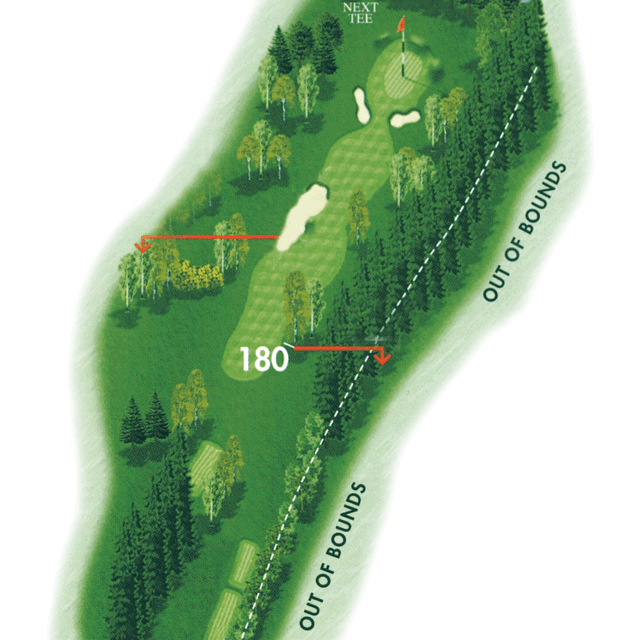
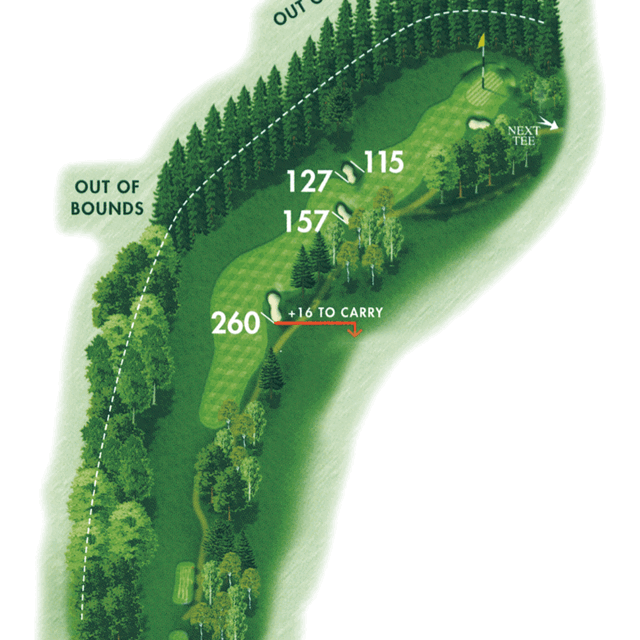
A brutally tough finish. Up to 200+ yards from the back tee makes this hole extremely difficult. The small green is relatively flat once you get there, you may just need to chip and putt here. Good news though, look up and the shining lights of the clubhouse will greet you.
- White 203 yards
- Green 190 yards
- Yellow 148 yards
- Blue 45 yards
Key Facts
- The amateur course record from the white tees is 70
- In competitions during 2017, the 18th hole has only recorded 3 birdies
- The 14th hole is the hardest for men with average score 5.27, and the 3rd hole is the hardest for ladies with an average score of 6.14
- The Constable course is 6,477 yards from the white tees